Photograms
|
What is a Photogram?
A photogram is an image that doesn't use a camera. It is made from light sensitive paper being placed in a dark room and then exposed to a bright white light at different times to change the exposer of the image. To make your image more interesting you can place objects on top of the light sensitive paper whilst exposing it to the light, so the objects cover certain places on the paper and turns them white. After you expose the paper to the light for about 3 seconds which I found is the perfect exposer times for my images you need to develop your image. First you fully submerge it in the developer chemical until you image is fully developed. Next you put it in the stop chemical which stops it from developing any further. After that you place it in the fix chemical which makes your image stay on the paper. Lastly you will wash the excess chemicals off the paper and dry it and then it is finished. I experimented with different exposer times and objects to find what created the most intriguing images. From my tests I found 3 second exposure to produce the best results and I really enjoy how the bike and spikey circles look on my images because they came out very sharp and clear. I've learnt that the more objects you put the more interesting your images look and to make sure your paper is completely flat on the table when creating a sandwich print because otherwise the objects become blurry on the sides. |
Dark Room

|
What is a dark room?
A dark room is a room used to process photographic film, to make prints and carry out other associated tasks. It is a room that can be made completely dark to allow the processing of the light-sensitive photographic materials, including film and photographic paper. For the photograms we used 3 different typed of chemicals. First you put it in the developer which you put the paper in for 2 minutes or until happy with how developed the image it. Then you put it in the stop which stops you image from developing further and take it out after 2 minutes. Lastly you put the paper in the fix chemical for 4 minutes which keeps your image on the paper. Then you wash and dry the image and then it is completed. |
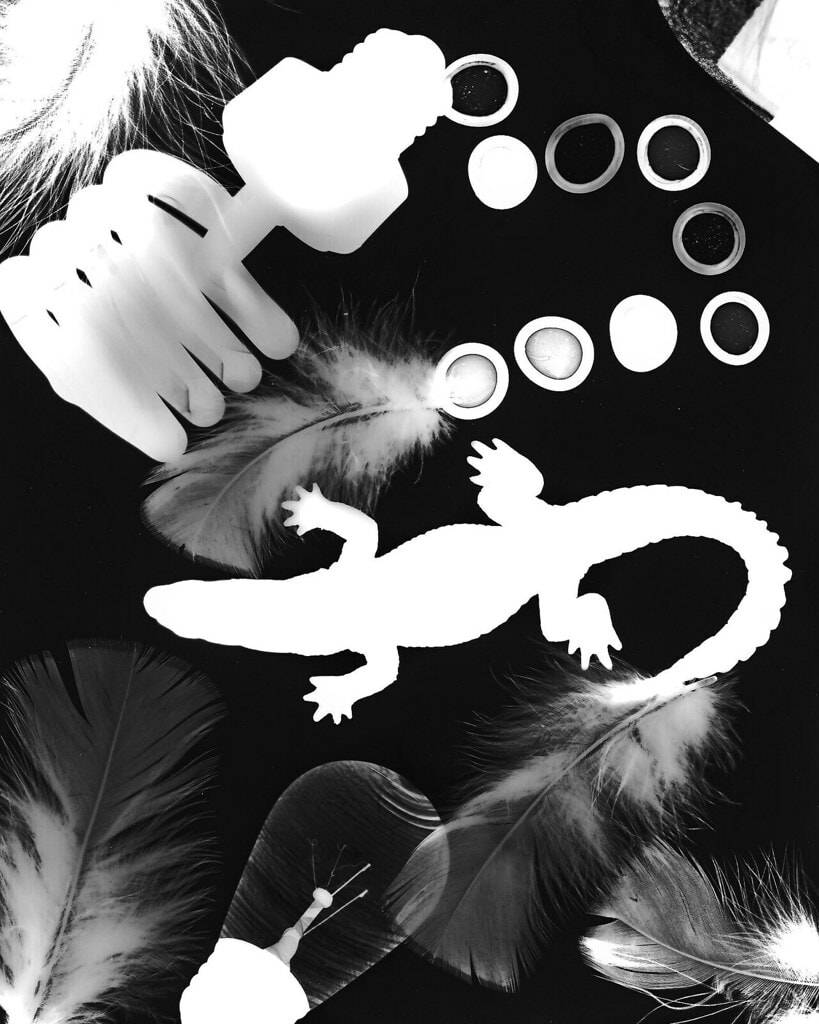
My Photograms

|
Test strip
Before experimenting with different techniques with my photograms I first has to do a test strip to see how the enlarger works and to find how long I would like to expose my images for. To do this I took a piece of black card and placed it over my paper. I started with the card covering 1/4 of my light sensitive paper and then exposed it for 1 second. Then I moved my card another 1/4 along so that now 1/2 of the paper was exposed and then exposed it again for 1 second. I then moved it so the card only covers 1/4 of the image and exposed it for 1 second. Finally I moved the card completely away from the paper and exposed my paper for the las time for 1 second. Now develop your paper and go threw all the chemicals and wash and dry the paper. This really helped me because I now understood all the aspects of a photogram and how to make a successful one. I learnt that exposing my paper for 3 seconds created the best result as the background was black and the objects where clear and white. |
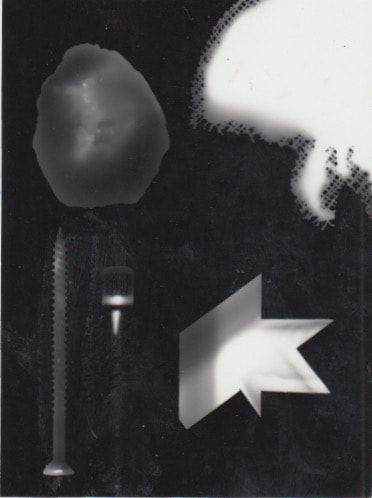
Solarisation

|
To solarise you need to first expose the paper to 2 seconds and then start to develop it. Once the image starts to develop take it out of the developer and expose it for another 2 seconds. After that go threw all the normal stages of creating a photogram but at the end the objects should look grey with shadows. I think this is one of my favourite techniques because the objects have shadows so it makes them look more real and gives another dimension to the image. I also think the grey and black work really well together and it is a nice contrast to see the grey after having only white and black photograms.
|
Painting with developer

|
To paint with developer you first need to place the objects you would like to use on the light sensitive paper and expose the paper to the enlarger when ready. Instead of fully submerging the paper in the developer you just take a paint brush and run it along the paper and flick the developer chemical onto the page. After you are happy with how the image looks you just put it in the stock and fix chemicals and then you have a very intriguing image. I really like how my version of this but if I was to do this again I would put more developer on the paper.
|
Double Exposer

|
To create a double exposer image you first need to pace your first set of objects on the page and expose the paper for 2 seconds. Then you take those objects off and place new objects on the paper and expose it again for another 2 seconds. Then you develop, fix, stop, wash and dry like with all other photo grams. The image should turn out to have 2 layers with one with white objects and one with grey objects. You can experiment with different exposer times and objects to create more interesting images but I like my use of the bike and how it looked behind the grey.
|
Weaving

|
To create my weave i first created a sandwich print of my original photo gram. Then I cut one of them vertically all along the paper with 1cm differences in each cut and leaving 1cm at the edge so the other paper stays still when creating a weave. For the other image you take it and cut it horizontally across the whole piece of paper leaving 1cm between each cut. Next you place the the cut out strips through the other piece putting it over and under and then the inverse every time you go down one. After finishing that tape all the sides together so the paper doesn't move at all and the lines stay straight.
|

|
Sandwich:To create a successful sandwich print you first need to create an average photogram and then after its made place it flat on a blank piece of light sensitive paper and expose it for 3 seconds under the enlarger light and go threw all the normal steps to make a photogram. After this process you should have created to opposite photograms. I think these two images were very successful because of the objects I used and how focused they are. I really enjoy this technique because of how contrasting the two images and how you can see the inverse of the same photogram next to the original one.
|

|
My Failed Attempts:

|

|
|

|
These Photo grams did not work how I intended them to do for a number of reasons. The two images on the left are 2 failed attempts at the technique of sandwich printing which involves placing an already made photo gram on a piece of light sensitive paper and then exposing it to the enlarger light. They didn't work as intended because the paper wasn't completely flat over the other one so the comers became blurry. The two on the right are my first 2 attempts and they didn't work very well because some of the objects are blurry and not the best choices. I needed to have adjusted my lens and also exposed them for less time.
Best Photo Grams:

Pin-hole Camera
Ben Nathan
|
|
|
Ben Nathan works across different media, from painting and photography to film and sculpture. His artistic practice reflects on the functionality of the city and its industry, documenting the evolution of urban change. Its scope draws attention to basic civil amenities, and the people who serve our society, in what could be considered as the ‘Real’ but ‘Invisible City’. His explorations into infrastructure act as a catalyst to question the changing nature of our city's environment and access to public or private space. He was awarded a grant on the Artist Dis-Placement programme, working on a scrap metal ship and at TSR metal recycling. In 2020 Ben established Pinhole London, a diverse community art project that programmes workshops, events and exhibitions with a focus on championing analogue photography. Our award-winning independent venture aims to engage a wide audience by providing a collaborative approach to creating artwork with local residents, schools and organisations. We create opportunities for people of all ages and learning needs to participate in creative ways to discover, record and learn from contemporary and historical viewpoints. Our approach is inclusive and accessible for all, and we are always on the lookout for new ideas and partners.
What is a pin-hole camera and how do you make it?

|
A pin hole camera is a type of camera that produces a highly focused image with a wide lens. To make it you take a long monster or beer can and cut the top circle off. Cut a bit of black card off and mark on it a 3.5cm border and 1cm strips on the other side. Then you fold all the strips inwards so they cover the whole top of the can so it doesn't let any light in. Now you tape the card down so it stays together and doesn't fall apart. Also you tape a black circle bottom so it doesn't let any light in. poke a needle in the can apart halfway down as this is where you will be able to let light in from and will work as your lens. Place a piece of electrical tape on top of the hole you just made so you can decide when you want to expose the paper. Every time you would like to take a picture you simply put a piece of light sensitive paper in you can and line it up with the hole and then expose it to light for as long as it needs, it depends on how light it is around you.
In this task I was asked to firstly make a pinhole camera out of a monster can and create a lid for it and put a hole in it. I then experimented with different exposer times and setting to find out what worked best for my pin-hole camera. There were 3 different images we were asked to complete. firstly a portrait, secondly a view from a window, then a corner of a building, and a double exposer image. I have examples of all of these below and the inverted versions of my original prints.
|
Portrait

|

|
These are my favourite images I created. The negative/ original image I produced from the can is nice and clear and sharp. I like how there are a lot of things in the frame of this image as I've included a person, building, tree, bench and more. This image is successful because it is focused as I kept the can still whilst i exposed it and exposed it for the right amount of time.
View from a window

|

|
In this pin hole camera image I had to place my can up against a window. In doing this you can see the difference from the subtle obstruction of the dirt on the window. If I was to take another image i would make sure i keep ,y can very still and id expose it for maybe a second or too less because my image came out quite dark which means its harder to see the objects in the image.
Corner of a building

|

|
This image is quite blurry and so when taking it I probably moved a bit by accident so it wouldn't be as clear as i could be. I kind of like the older look of the image on the right and although it inst what was asked of me or what i intended to take came out quite nice and it has a nice vintage look.
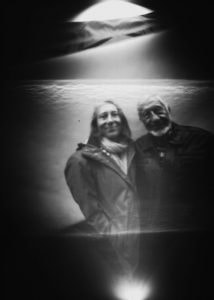
Double Exposure

|

|
I really enjoy how these images turned out because the person has a ghost-like effect on my model. This image is intriguing as it is unusual to see the same person twice in one image and have them see-threw. I think the picnic tables behind my model work well because it is interesting that you can still see them threw my model and they make riveting lines in my models body.
My first Pin-hole camera image

Overall Evaluation:
My favourite pin hole camera image I took was the portrait one because it came out the most clear and had a lot of different objects and things in one image. I exposed it to the light for 4 seconds and kept my can very still which i found to be the problem for my failed attempts. My can worked well and it was light tight. At the beginning i struggled to create a clear image with the right exposure but after getting used to the can and finding the right exposer it was quite easy. Over the different days we took our images in we had to change the exposer time because the lighting was different. Because of that I now have a good understanding of exposure and light in my photos.
My favourite pin hole camera image I took was the portrait one because it came out the most clear and had a lot of different objects and things in one image. I exposed it to the light for 4 seconds and kept my can very still which i found to be the problem for my failed attempts. My can worked well and it was light tight. At the beginning i struggled to create a clear image with the right exposure but after getting used to the can and finding the right exposer it was quite easy. Over the different days we took our images in we had to change the exposer time because the lighting was different. Because of that I now have a good understanding of exposure and light in my photos.
SLR Camera

|
What is an SLR camera?
A SLR Camera is a type of camera that uses that typically uses a mirror and prism system that permits the photographer to view through the lens and see exactly what will be captured. They use a film made of plastic, gelatine and other material to record the image. Because of this you have to load and unload film into the camera and develop it in a dark room to see the images you took. It has a winder on the right side of the camera to wind the film after each image is taken so a new piece of film is ready to be exposed. To have good exposure you need a balance of shutter speed aperture and ISO. |
What is Aperture?
Aperture is the section of the camera that can be adjusted to let in more or less light. A small aperture lets in less light and leads to a darker image, while a larger one can flood the sensors with light. It is located in the lens of the camera. Aperture is measured in F stops and every next size is half the one before it.
What is shutter speed?
Shutter speed is the length of time that the film or digital sensor inside the camera is exposed to light when taking a photograph. The amount of light that reaches the film or image sensor is proportional to the exposure time. A slow shutter speed means the camera is exposed for more time so the image can create a blurry image and movement can be seen. However a fast shutter speed creates a very clear and sharp image because the camera is exposed for less time so it doesn't allow for movement to be seen. It is located in the body of the camera and is measured in fractions of a second.
In this task we are required to learn about the SLR camera and how it works. We started by learning about the importance of film in this camera and how to load and unload it safely. I learnt that you have to make sure the film is never exposed to light other then when you are ready to take a photo because otherwise it would be over exposed and would ruin all your images. To load the film you first open the back of the camera and place it on the left side and start to unravel the film and place it in the gap on the other side and start to reel it in on the other side until it lays flat on the back of the camera. After that is completed you can close the back of the camera and take all your images. When your finished photographing you turn the window clockwise so it ends up back on the left side of the camera because when you take your images they all end up on the right side of the camera. The film can now be easily popped out of the camera and is ready to be developed in a dark room.
Contact Sheets
|
A contact sheet is an online gallery of the best images from your shoot. It is a positive print of all the negative images from a roll of 35mm film or medium format film. They are typically made to allow the photographer to view a mini-preview of all the film to determine which photographs are best to print. Photographers viewing a contact sheet will often use a loupe which is a type of magnification device to see small details more closely. You simply place the strips of film emulsion side down on a piece of photographic paper, ensuring everything lays flat, and expose the paper. 35mm film should be cut into strips of 5 or 6 frames, and medium format film into strips of 3 or 4 frames. You can either carefully place the negative directly on the paper, or you can place the film in an 8 x 10 inch protective, transparent film sleeve and place the entire sleeve on your paper.
|

|
Test Strips:

|

|
Before printinting my full contact sheet with all my film I had to take test strips of my negative so I knew how long each picture needed to be exposed for. I reliased quickly that each row needed a different exposure time so i test stiped each row and fond that one needed 6 seconds one nedded 12 and one needed 16 so I blocked them out with card and exposed each row separately.
Enlarging My Film:

|

|
I also did test strips for my enlarged images to get the right exposure again and I had to do this for each image because they had different light and dark bits in the image. I found that 4 seconds was a good place to start, and all of my images needed around that long. I've realised now that in 1 image I have light and dark areas and I should have covered bits of my image and exposed other bits longer than some because some areas of my images are under exposed.
Finished Enlarged Images:

|

|

How Do You Enlarge Your Film Images?
I Enlarged my images by first selecting my favourite images and making sure they were taken well enough that the englager would be able to register them and see all the parts of the images. I place 1 image at a time in the enlarger and did a test strip to see how long I would expose each image for. After developing my strip and finding the right time I could then print my photo. I focused and turned the aperture all the way up so my image would come out clear and then exposed my image. I then went through all the chemicals like normal and then repeated the whole thing for each image.
I Enlarged my images by first selecting my favourite images and making sure they were taken well enough that the englager would be able to register them and see all the parts of the images. I place 1 image at a time in the enlarger and did a test strip to see how long I would expose each image for. After developing my strip and finding the right time I could then print my photo. I focused and turned the aperture all the way up so my image would come out clear and then exposed my image. I then went through all the chemicals like normal and then repeated the whole thing for each image.
Photo from aresauburn™
